Summary
This module is focused on advanced SQL injection techniques, specifically when working with PostgreSQL. The target for this module is a Java/Spring application which we will decompile, analyze and eventually exploit.
This module is split up into the following sections:
Introduction: These sections serve as a very brief introduction to interacting with PostgreSQL.Identifying Vulnerabilities: In these sections we cover various white-box techniques for identifying/debugging SQL injection vulnerabilities in Java applications.Advanced SQL Injection Techniques: Throughout these sections we cover the following advanced SQL injection techniques:- Common character bypasses
- Error-based SQL injection
- Second-order SQL injection
PostgreSQL-Specific Techniques: These sections teach you the following attacks specific to PostgreSQL:- Reading and writing files
- Command execution
Defending Against SQL Injection: In this section we discuss how to fix/prevent SQL injection vulnerabilities from the point of view of a developer.Skills Assessment: Here we put your skills to the test! Identify and exploit multiple SQL injections in a Java application on your own.
After completing this module, you should be comfortable identifying and exploiting advanced SQL injection vulnerabilities, especially against Java applications and PostgreSQL databases.
CREST CPSA/CRT-related Sections:
- All sections
CREST CCT APP-related Sections:
- All sections
CREST CCT INF-related Sections:
- All sections
This module is broken into sections with accompanying hands-on exercises to practice each of the tactics and techniques we cover. The module ends with a practical hands-on skills assessment to gauge your understanding of the various topic areas.
You can start and stop the module at any time and pick up where you left off. There is no time limit or "grading," but you must complete all of the exercises and the skills assessment to receive the maximum number of cubes and have this module marked as complete in any paths you have chosen.
As you work through the module, you will see example commands and command output for the various topics introduced. It is worth reproducing as many of these examples as possible to reinforce further the concepts presented in each section. You can do this in the PwnBox provided in the interactive sections or your virtual machine.
The module is classified as "hard" and assumes an intermediate knowledge of how web applications function and common attack principles. It is highly recommended to also complete the following modules before starting this one:
- SQL Injection Fundamentals
- Blind SQL Injection
Introduction to PostgreSQL
Introduction
In this module we will be exploring a few advanced SQL injection techniques as well as some PostgreSQL-specific attacks from a white-box approach. As this is an advanced module, an understanding of SQL syntax, SQL injections and Python3 is expected to fully grasp the concepts explained. Although this module will focus on PostgreSQL, the same techniques can be adapted to work with other SQL variants, as it is a standardized language.
Interacting with PostgreSQL
Before we get into injection vulnerablities, let's take a moment to familiarize ourselves with two of the most common tools for interacting with PostgreSQL databases: psql and pgAdmin4.
psql (PostgreSQL Interactive Terminal)
psql is a command-line tool for interacting with PostgreSQL databases that comes pre-packaged with the PostgreSQL server and works on Linux or Windows.
You can install psql on a Linux distribution with this single command:
[!bash!]$ sudo apt install postgresql-client-15
Note: It's possible that the distribution of Linux you are running does not have version 15. In that case, you can install version 13 and everything will work fine with minimally adapted steps.
To install psql on Windows, you should first download the PostgreSQL installer from postgresql.org and then during the installation process unselect everything except for Command Line Tools.

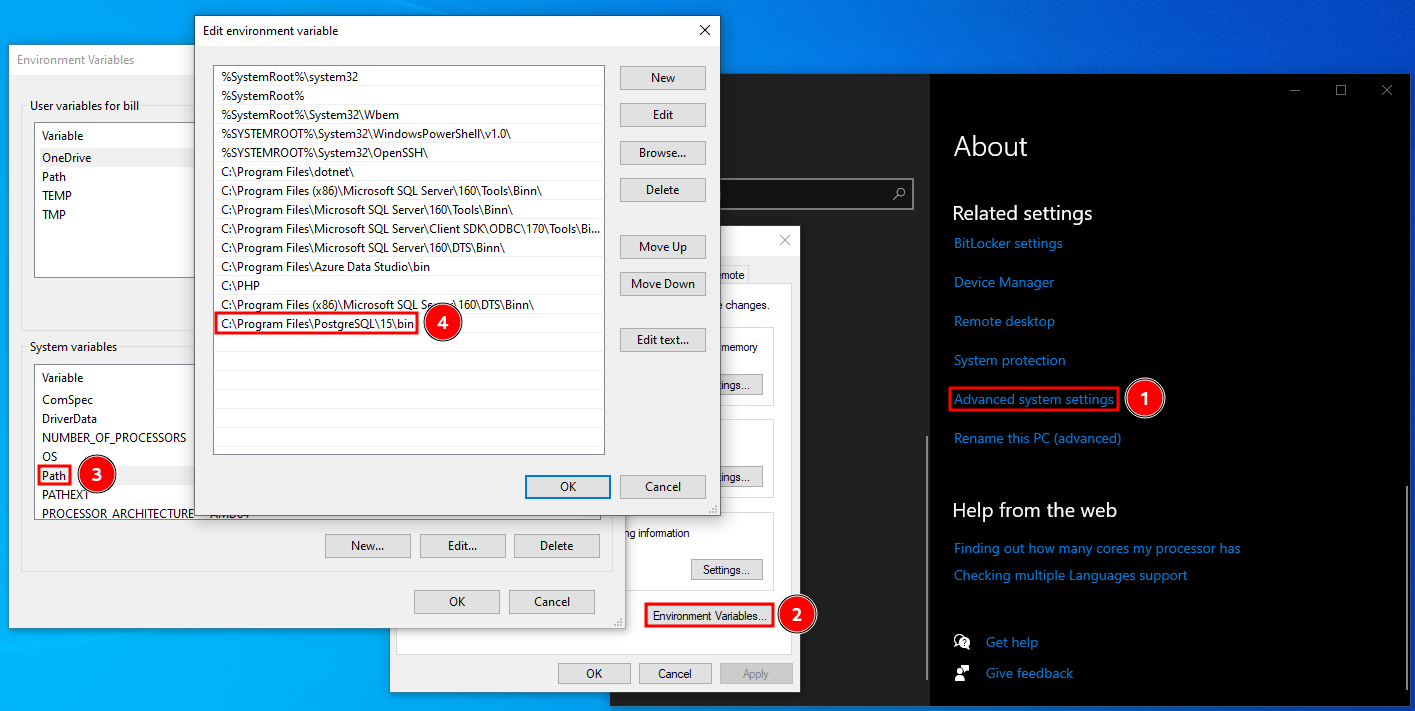
Once it's done installing, you may use psql.exe from the installation directory (C:\Program Files\PostgreSQL\15\bin by default) or you can add the directory to the system PATH variable to be able to use it from anywhere:
Once you've installed psql on your operating system of choice, you can connect to a PostgreSQL database with the following command:
[!bash!]$ psql -h 127.0.0.1 [-p PORT] -U acdbuser acmecorp
Password for user acdbuser:
psql (15.1 (Debian 15.1-1+b1), server 13.9 (Debian 13.9-0+deb11u1))
SSL connection (protocol: TLSv1.3, cipher: TLS_AES_256_GCM_SHA384, compression: off)
Type "help" for help.

acmecorp=>
Once connected, you can list databases with the \l command or \l+ for extended details.
acmecorp=> \l
                                             List of databases
   Name    |  Owner   | Encoding | Collate |  Ctype  | ICU Locale | Locale Provider |   Access privileges
-----------+----------+----------+---------+---------+------------+-----------------+-----------------------
 acmecorp  | postgres | UTF8     | C.UTF-8 | C.UTF-8 |            | libc            |
 postgres  | postgres | UTF8     | C.UTF-8 | C.UTF-8 |            | libc            |
 template0 | postgres | UTF8     | C.UTF-8 | C.UTF-8 |            | libc            | =c/postgres          +
           |          |          |         |         |            |                 | postgres=CTc/postgres
 template1 | postgres | UTF8     | C.UTF-8 | C.UTF-8 |            | libc            | =c/postgres          +
           |          |          |         |         |            |                 | postgres=CTc/postgres
(4 rows)
To switch to a database you can use the \c <DATABASE> command. In this case we are already in the acmecorp database.
To list the tables in a database (after you've switched to it), you can use the \dt command or \dt+ for extended information.
acmecorp=> \dt+
                                        List of relations
 Schema |    Name     | Type  |  Owner   | Persistence | Access method |    Size    | Description
--------+-------------+-------+----------+-------------+---------------+------------+-------------
 public | departments | table | postgres | permanent   | heap          | 8192 bytes |
 public | dept_emp    | table | postgres | permanent   | heap          | 72 kB      |
 public | employees   | table | postgres | permanent   | heap          | 176 kB     |
 public | salaries    | table | postgres | permanent   | heap          | 72 kB      |
 public | titles      | table | postgres | permanent   | heap          | 80 kB      |
(5 rows)
Last, but not least, you can query the database simply by entering the query and making sure it's terminated with a semicolon. Multi-line queries work as well.
acmecorp=> SELECT first_name, last_name, email FROM employees LIMIT 5;
 first_name |  last_name  |           email
------------+-------------+---------------------------
 Kathleen   | Flint       | [email protected]
 Henry      | Watson      | [email protected]
 Ruth       | Perez       | [email protected]
 Leon       | Tappin      | [email protected]
 Donita     | Fairweather | [email protected]
(5 rows)
pgAdmin4
pgAdmin4 is a GUI application for interacting with PostgreSQL databases that works on Linux and Windows.
To install pgAdmin4 on Linux, run the following commands:
[!bash!]$ curl -fsS https://www.pgadmin.org/static/packages_pgadmin_org.pub | sudo gpg --dearmor -o /usr/share/keyrings/packages-pgadmin-org.gpg
[!bash!]$ sudo sh -c 'echo "deb [signed-by=/usr/share/keyrings/packages-pgadmin-org.gpg] https://ftp.postgresql.org/pub/pgadmin/pgadmin4/apt/$(lsb_release -cs) pgadmin4 main" > /etc/apt/sources.list.d/pgadmin4.list && apt update'
[!bash!]$ sudo apt install pgadmin4
Note: If you are using Kali or ParrotOS (like the Pwnbox), you will want to replace $(lsb_release -cs) in the second command with bullseye, otherwise the installation will fail.
To install pgAdmin4 on Windows you can download the installer from pgadmin.org and follow the installation steps, or you can reuse the installer we used to install psql.exe, just make sure the pgAdmin4 option is checked this time in the installation process.
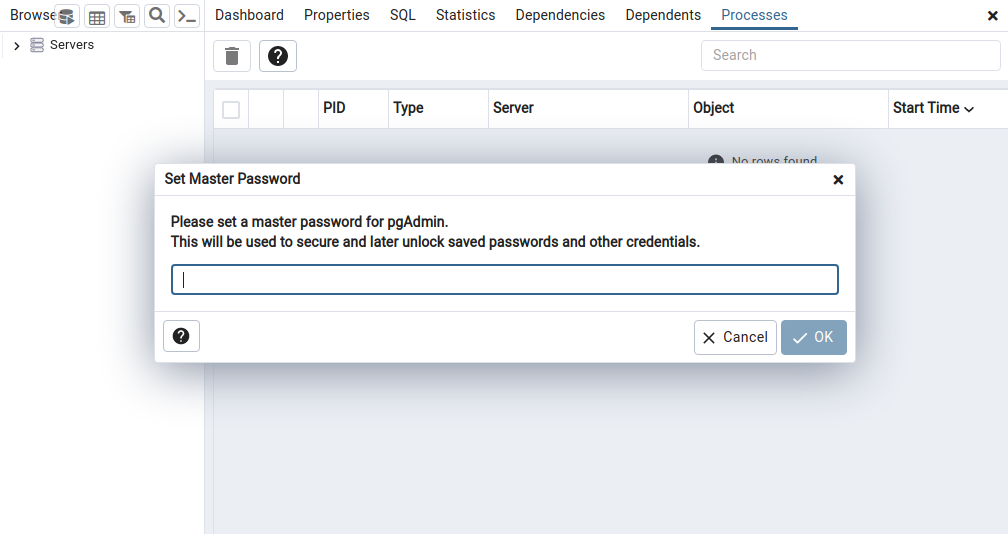
The first time you launch pgAdmin4 you will have to set a master password. This is simply to protect the credentials you will later use to connect to databases.
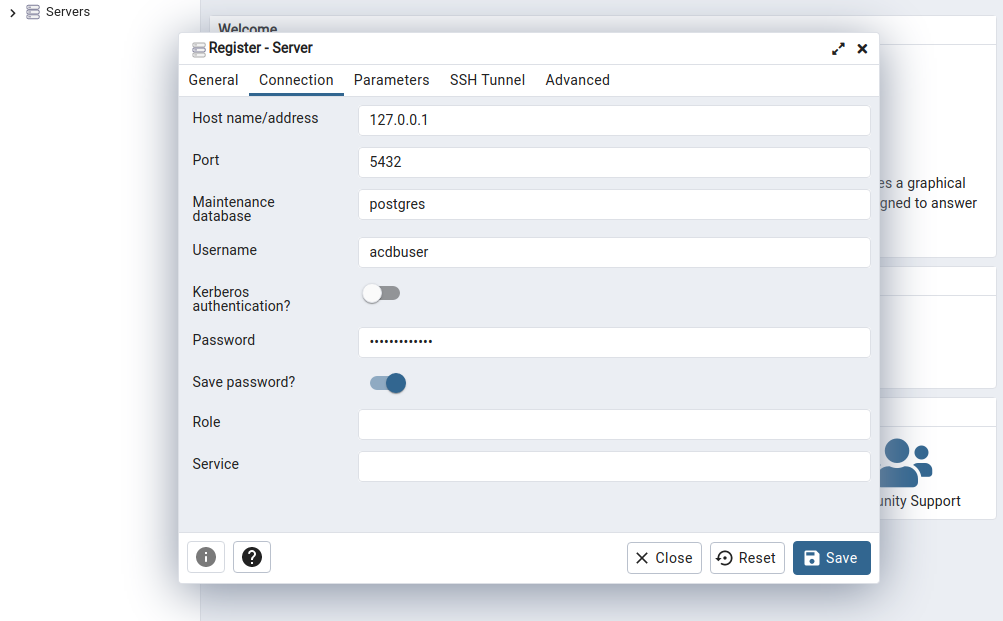
To connect to a PostgreSQL server, go to Dashboard > Add New Server, fill out the details and press Save.
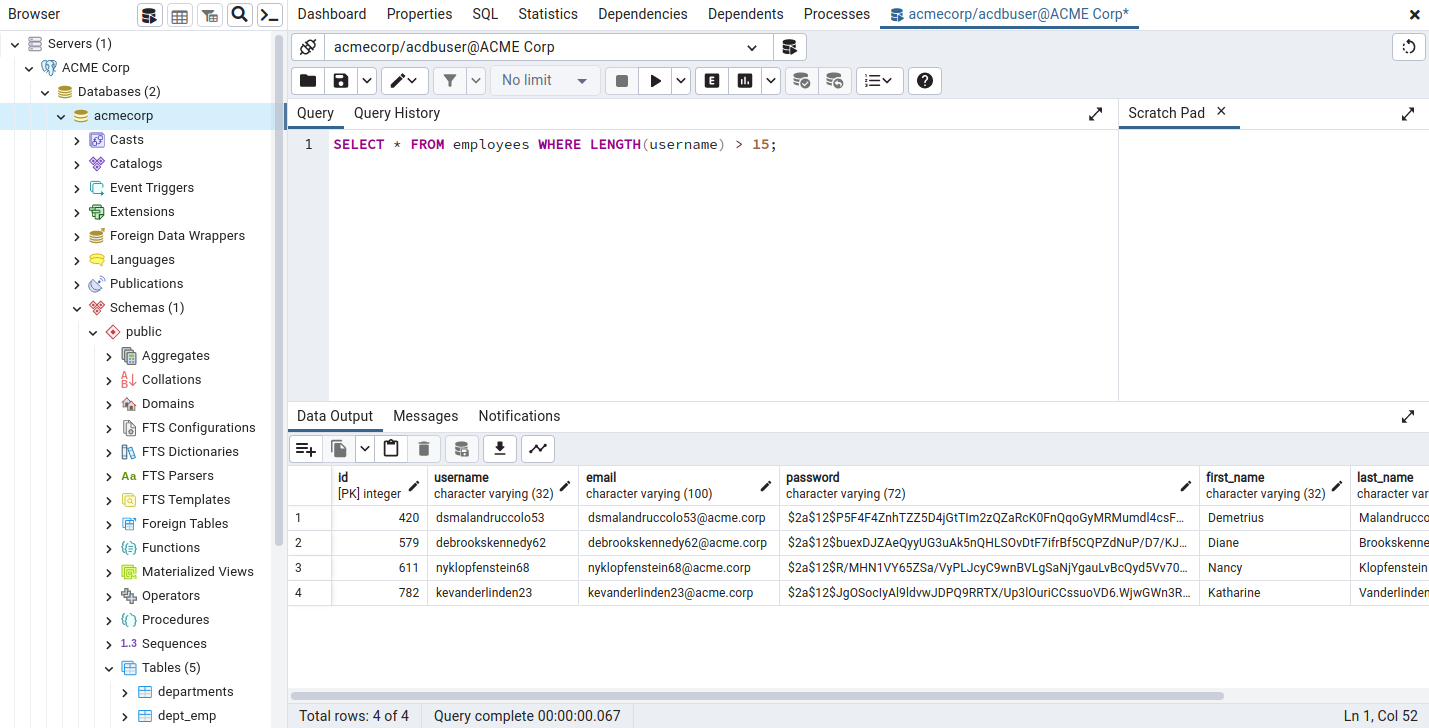
Once you've done that, you can access the server on the left-hand side under whatever name you chose. Viewing databases and tables is very intuitive with this graphic interface, and running queries is as simple as right-clicking on a database and selecting the Query Tool.
Practice
To finish off this section install psql or pgAdmin4, spawn and connect to the target database (acmecorp) with the credentials acdbuser:AcmeCorp2023!, and then answer the questions below.


